ShopDreamUp AI ArtDreamUp
Deviation Actions


Suggested Deviants


Suggested Collections


You Might Like…


Featured in Groups


Description
THE FILES: files.fm/u/gpgkslq
Instead of the typical scary Hallloween´s photo of the last year and inspiring me for this year seasson I decided teach you guys how to do this awesomeness mr0spot.deviantart.com/art/Jus… but with his own hands using Pshop, but Im pretty sure you can also do it with Gimp or stuff, isnt so hard as it can look and best of all you can decide how awesome ca be the final result so isnt necessary you follow all the steps exactly. I hope you want do it :-D
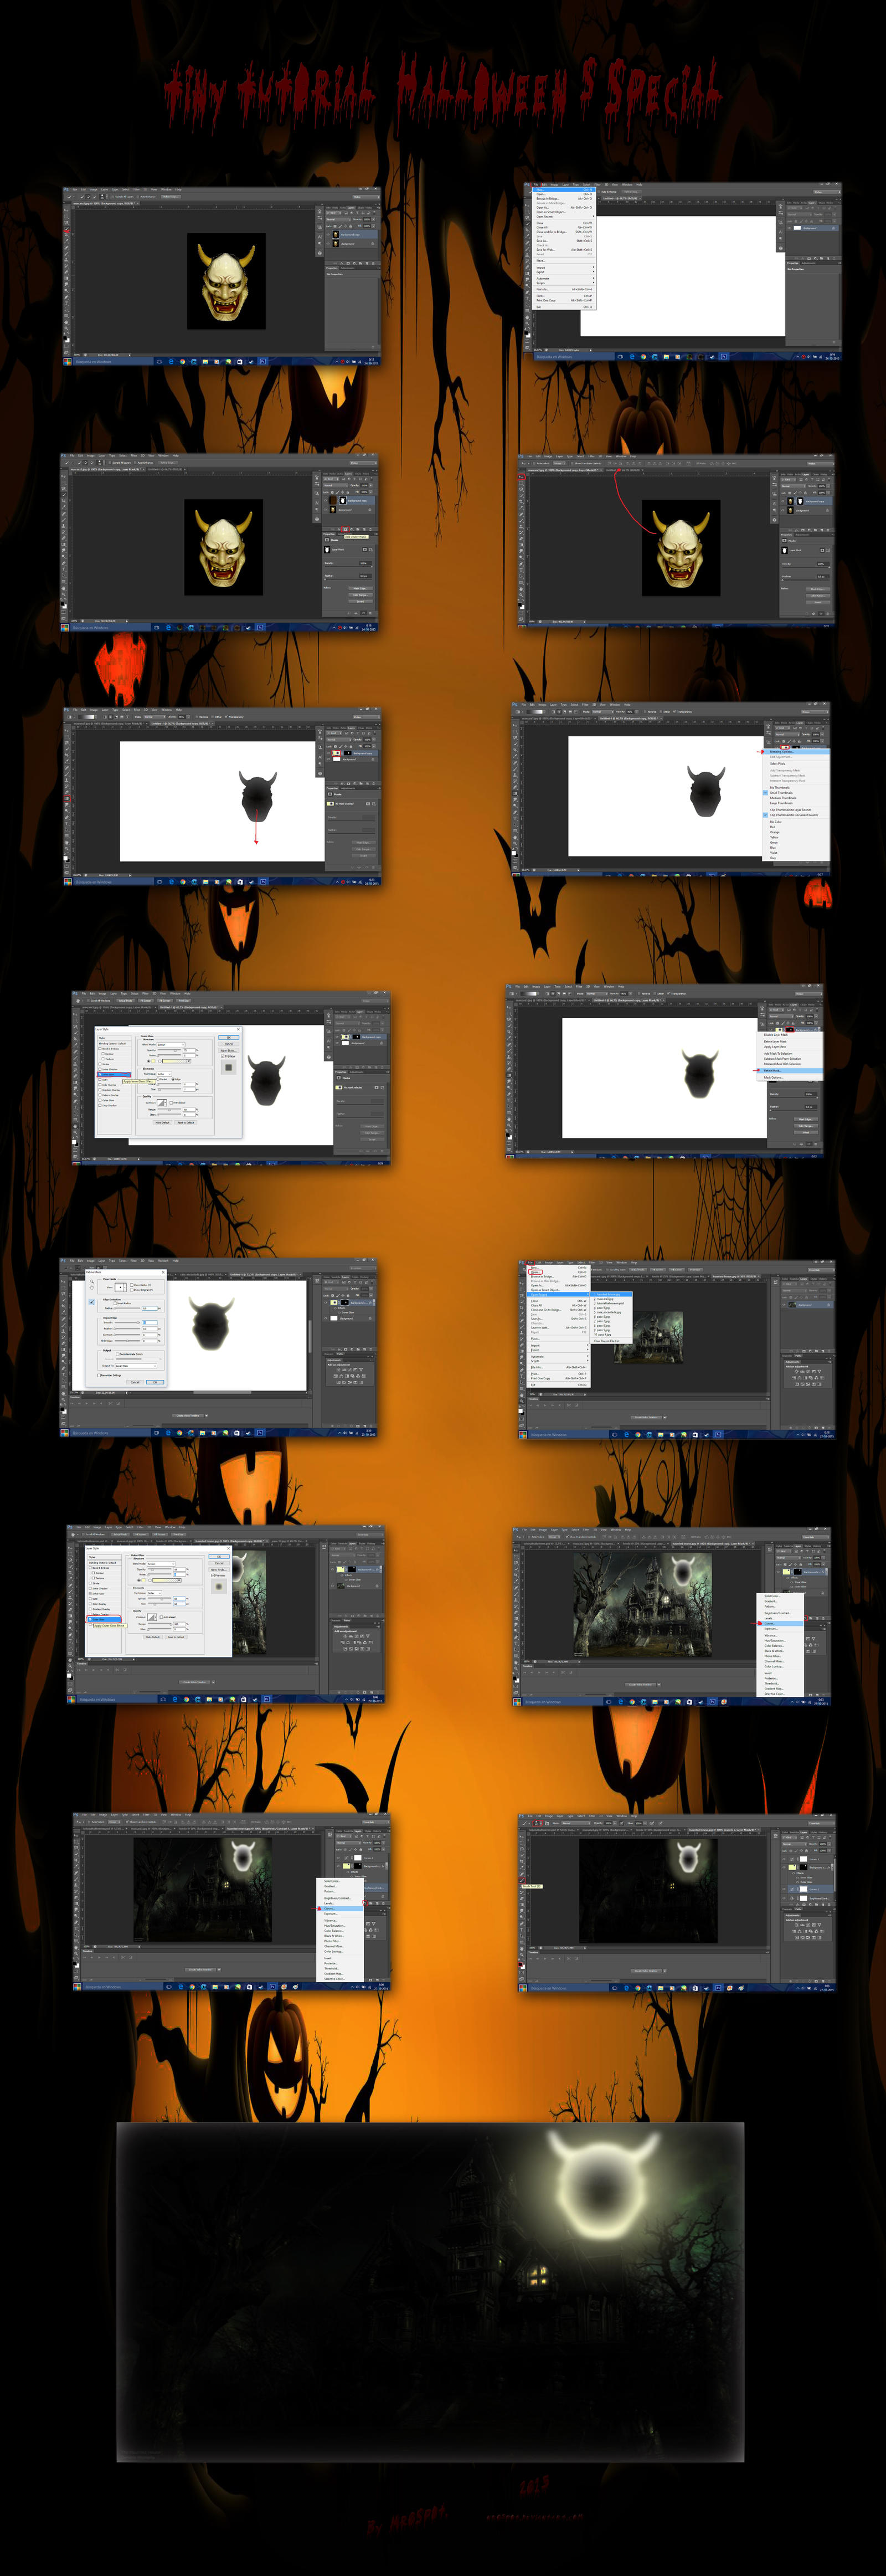
Like its look the image it litlte heavy to see it in zoom mode so I think Im gonna write here the proper steps to do this:
1.-Click on the open button and search the mask image that I let you guys on the description and use the selection brush tool selecting all the mask and ONLY the mask
2.-open a new white file and then go back at the windows where is the selected mask, click on the ´´mask´´ button
3.-now with the masked mask (xD) take the selected layer and take it to the white background when were´re gona edit it
4.-now click on the gradent button and ckick and hold since start the nose until a bit more down when the mask finish
5.-click on the right layer of the 2 layers up of the background layer and do a right click, select ´´blending options´´
6.- Now we´re in Layer style , click on the option ´´Inner glow´´. Using the diferent parameters put more or less Backlight effect to your mask
(In this case I selected Range over 50, opacity 75 and size 7)
7.-Now to fix that ugly and unnaturals edges of our masked mask (lol xP) we do right click on the right layer of the mask,select the option ´´Refine mask
8.- Go to smooth option and unsing the leveling arrows select 93, click on ok
9.-We´re almost done, no go to open and open the Haunted house background I let you guys on the description
10.- Now using the move tool we move our glowing mask to the haunted house background
#Note: If we feel that the original sixe of the mask is a bit big for the background simply select Edit option and select the option ´´Transform´´then select Free Transform, and then we low or up the the size of the mask to our prefferences
11.-Next we right click on the left layer ang again select ´´Blending options´´, Go to the Outer Glow option
12.-Like in the Inner glow option we´re worked a few steps again select with arrows leveling the amount of outside brightness we want for our terrifying mask ( in this case I selected( the next parametters: Opacity: 18 Spread: 60 Size: 62) click on ok.
13.- Now its time to edit the Haunted house background. Click on the hounted house layer and then select the Filters option (the grey-white circle) select the option ´´Curves´´
14.- Using the curve line (Just clicking the center circle in any place) We vary the exact amount you want in levels of light and darkness for our image
15.- Finally we go back to the filters section and select the opton Brightess/ Contrast, using the Leveling arrows we select the ammount of even more light and darkess to improve the spooky ambien of the image. When we´re ready just click on ok
Thats all, guy. Now you created an scary image for this scary halloween using pshop !!!


HAPPY HALLOWEEN AND TRICK OR TREAT!! BUAAHHHAAHAHAH >: D
Instead of the typical scary Hallloween´s photo of the last year and inspiring me for this year seasson I decided teach you guys how to do this awesomeness mr0spot.deviantart.com/art/Jus… but with his own hands using Pshop, but Im pretty sure you can also do it with Gimp or stuff, isnt so hard as it can look and best of all you can decide how awesome ca be the final result so isnt necessary you follow all the steps exactly. I hope you want do it :-D
Like its look the image it litlte heavy to see it in zoom mode so I think Im gonna write here the proper steps to do this:
1.-Click on the open button and search the mask image that I let you guys on the description and use the selection brush tool selecting all the mask and ONLY the mask
2.-open a new white file and then go back at the windows where is the selected mask, click on the ´´mask´´ button
3.-now with the masked mask (xD) take the selected layer and take it to the white background when were´re gona edit it
4.-now click on the gradent button and ckick and hold since start the nose until a bit more down when the mask finish
5.-click on the right layer of the 2 layers up of the background layer and do a right click, select ´´blending options´´
6.- Now we´re in Layer style , click on the option ´´Inner glow´´. Using the diferent parameters put more or less Backlight effect to your mask
(In this case I selected Range over 50, opacity 75 and size 7)
7.-Now to fix that ugly and unnaturals edges of our masked mask (lol xP) we do right click on the right layer of the mask,select the option ´´Refine mask
8.- Go to smooth option and unsing the leveling arrows select 93, click on ok
9.-We´re almost done, no go to open and open the Haunted house background I let you guys on the description
10.- Now using the move tool we move our glowing mask to the haunted house background
#Note: If we feel that the original sixe of the mask is a bit big for the background simply select Edit option and select the option ´´Transform´´then select Free Transform, and then we low or up the the size of the mask to our prefferences
11.-Next we right click on the left layer ang again select ´´Blending options´´, Go to the Outer Glow option
12.-Like in the Inner glow option we´re worked a few steps again select with arrows leveling the amount of outside brightness we want for our terrifying mask ( in this case I selected( the next parametters: Opacity: 18 Spread: 60 Size: 62) click on ok.
13.- Now its time to edit the Haunted house background. Click on the hounted house layer and then select the Filters option (the grey-white circle) select the option ´´Curves´´
14.- Using the curve line (Just clicking the center circle in any place) We vary the exact amount you want in levels of light and darkness for our image
15.- Finally we go back to the filters section and select the opton Brightess/ Contrast, using the Leveling arrows we select the ammount of even more light and darkess to improve the spooky ambien of the image. When we´re ready just click on ok
Thats all, guy. Now you created an scary image for this scary halloween using pshop !!!
HAPPY HALLOWEEN AND TRICK OR TREAT!! BUAAHHHAAHAHAH >: D
Image size
7670x22288px 33.31 MB
© 2015 - 2024 mr0spot
Comments6
Join the community to add your comment. Already a deviant? Log In
Espero verlo bien, cuando le indico ACERCAR marca ERROR.